Table of Contents
How to install Windows Subsystem For Android Download (WSA) on Windows 11
Windows Subsystem for Android (WSA) is a fantastic feature on Windows 11 that allows users to run Android apps on their PC. However, if you’re outside the USA, you might encounter some issues installing WSA from the Microsoft Store. Don’t worry; this guide will walk you through the process of installing WSA manually without using the Microsoft Store.
Step-by-Step Guide to Installing WSA on Windows 11 Without Microsoft Store

1. Enable Virtualization
Before you can install WSA, you need to ensure that virtualization is enabled on your PC.
- Check Virtualization Status:
- Open Task Manager (Ctrl + Shift + Esc).
- Click on the Performance tab.
- Select CPU and check if virtualization is enabled.
- Enable Virtualization (if disabled):
- Restart your PC and enter the BIOS/UEFI settings (usually by pressing F2, F10, or Del during startup).
- Find the virtualization settings and enable it.
- Save changes and exit BIOS/UEFI.
2. Enable Windows Virtual Machine Platform
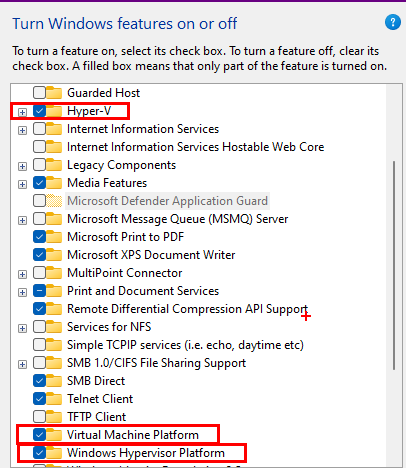
To run WSA, you need to enable the Windows Virtual Machine Platform.
- Open the Start menu and search for Turn Windows features on or off.
- Scroll down and check the box for Virtual Machine Platform.
- Click OK and restart your PC if prompted.
3. Download WSA Installation Package
Since you cannot download WSA from the Microsoft Store, you need to download the installation package manually.
- Open the provided link (given in the description box of your source).
- Use the product ID provided to download the WSA package.
- Enter the product ID in the search box on the website.
- Scroll down and find the file with a .msixbundle extension (approximately 1.37 GB).
- Download the file. If using Google Chrome, switch to Firefox if you encounter any download issues.
4. Install WSA Using PowerShell
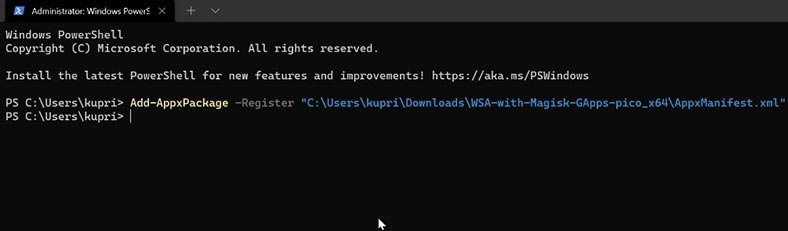
Once the download is complete, you can install WSA using PowerShell.
- Copy the file path:
- Right-click the downloaded file and choose Copy as the path.
- Open PowerShell as Administrator:
- Search for PowerShell in the Start menu, right-click it, and select Run as administrator.
- Run the installation command:
- Type the following command:
Add-AppxPackage -Path "paste the copied file path here" - Press Enter and wait for the installation to complete.
5. Launch WSA
After the installation is complete, you can find WSA in your Start menu. Click to launch and start enjoying Android apps on your Windows 11 PC.
Conclusion
Installing Windows Subsystem for Android on Windows 11 without the Microsoft Store is straightforward if you follow these steps. Enabling virtualization, ensuring the Virtual Machine Platform is active, and manually downloading and installing the WSA package will allow you to run Android apps seamlessly. Stay updated with future guides and tips by subscribing to our channel and sharing your experiences in the comments.