Table of Contents
How To Transfer Data From iPhone to iPhone
Introduction
Upgrading to a new iPhone is always exciting, but transferring all your data can be daunting. Luckily, Apple has made this process straightforward and efficient. In this comprehensive guide, we’ll walk you through the best way to transfer all your data from your old iPhone to your new one, ensuring that everything from your apps and photos to your messages and settings is seamlessly carried over. By the end of this guide, you’ll also know how to safely erase your old iPhone so you can sell it or pass it on without sharing your data.
Pre-Transfer Checklist
Before diving into the transfer process, you need to take a few essential steps to ensure everything goes smoothly.
- Power Up: Make sure both your old and new iPhones are plugged into power. The last thing you want is for either phone to run out of battery during the transfer, as this process can take several hours depending on the amount of data you’re moving.
- Check Connections: On your old iPhone, make sure Wi-Fi and Bluetooth are enabled. These connections are crucial for your old phone to locate the new one and facilitate the transfer.
- Update iOS: Ensure that your old iPhone is running the latest version of iOS it supports. To check for updates, go to Settings > General > Software Update. If an update is available, install it before proceeding.
- Move Your SIM Card: If you’re using a physical SIM card, this is a good time to transfer it from your old phone to your new one. If you’re using an eSIM, you’ll handle this step later in the process.
Starting the Transfer Process
With your pre-transfer checklist complete, it’s time to begin the data transfer.
- Set Up Your New iPhone:
- Power on your new iPhone. It should display the “Hello” screen in various languages. This is the first screen you’ll see after unboxing your device.
- If you’ve already started setting up your new iPhone and need to return to the “Hello” screen, you’ll need to reset it. Go to Settings > General > Transfer or Reset iPhone > Erase All Content and Settings. Follow the prompts to reset the device.
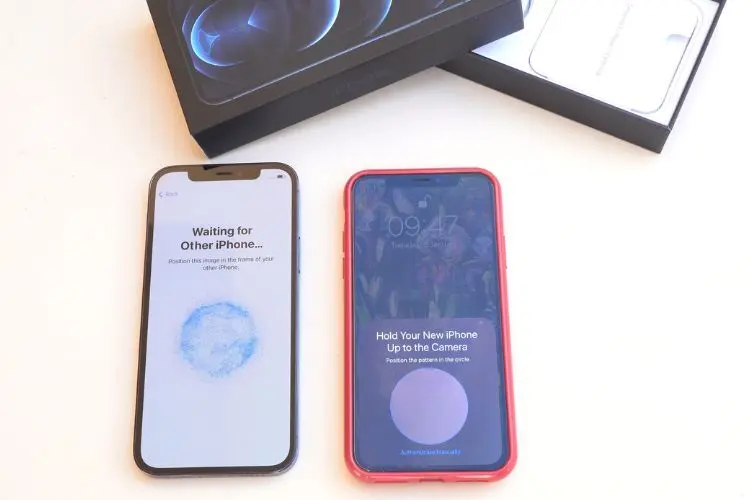
- Pair Your Devices:
- Unlock your old iPhone. You should see a prompt asking if you want to set up your new iPhone. Tap “Continue.”
- If you don’t see this prompt, swipe up from the “Hello” screen on your new iPhone or restart it. Ensure that both phones have Wi-Fi and Bluetooth enabled.
- Use your old iPhone to scan the animation on the screen of your new iPhone. This will pair the two devices and start the data transfer process.
- Set Up Face ID:
- After pairing, you’ll be prompted to set up Face ID on your new iPhone. This step is necessary for security reasons, and it’s one of the few things that won’t transfer automatically from your old phone.
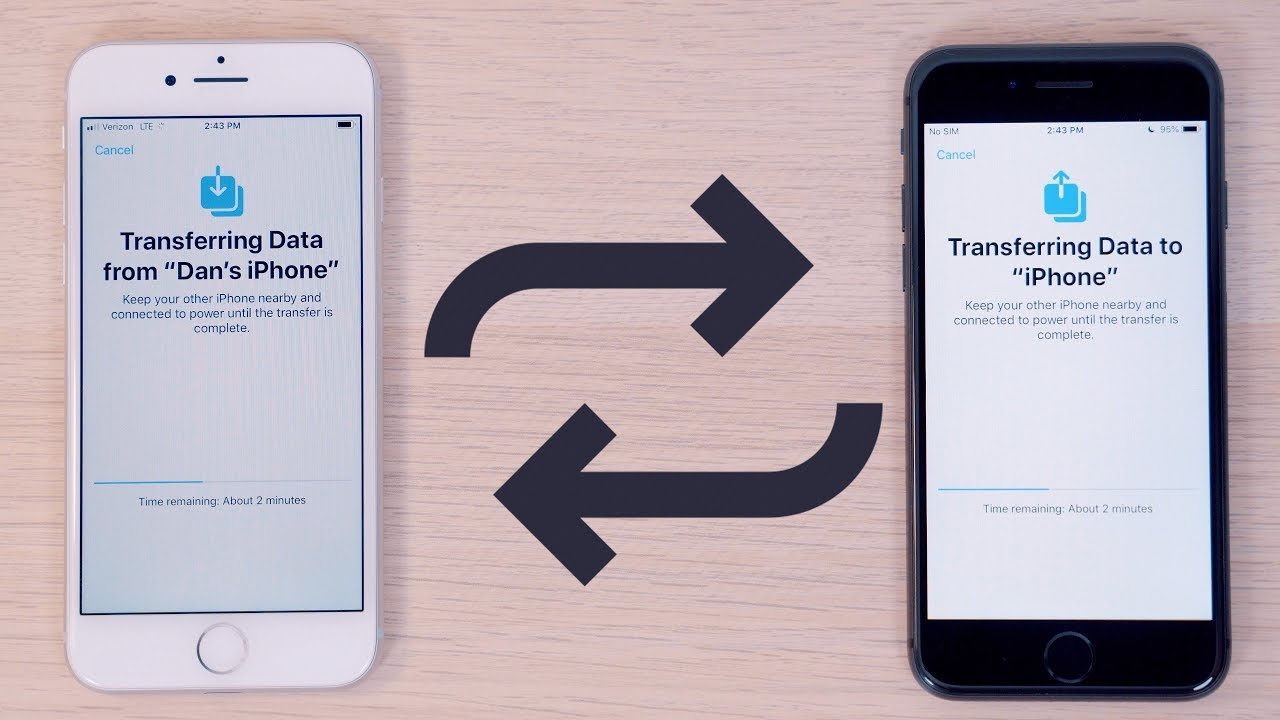
- Transfer Your Data:
- You’ll be asked if you want to transfer your data from your old iPhone directly or use iCloud. For the most reliable transfer, select the phone-to-phone option.
- The time it takes to transfer data will depend on how much you have and the speed of your Wi-Fi connection. It can take anywhere from 30 minutes to several hours.
- Tip: Utilize Quick Start: If you’re switching from an iPhone running iOS 12.4 or later, you can use the Quick Start feature to speed up the process. Just bring your old and new iPhone close together, and follow the on-screen instructions. This method is even faster and more seamless.
Final Steps
- Sign in to iCloud:
- During the transfer, you’ll be prompted to sign into your iCloud account. This will carry over contacts, calendars, mail accounts, and other data.
- Review Transfer Overview:
- Before the transfer begins, you’ll get an overview of what will be transferred, including apps, settings, and even your Apple Watch pairing. Tap “Continue” to proceed.
- Enable Location Services:
- You’ll be asked whether you want to enable location services on your new iPhone. It’s recommended to enable this, as many apps require it.
- Add Apple Pay Cards:
- If you use Apple Pay, you’ll need to re-enter the security codes for your cards. Loyalty cards and train tickets will also transfer over, but credit and debit cards require extra authentication.
- Complete the Transfer:
- Agree to the terms and conditions, and the transfer will begin. Once complete, your new iPhone will be a mirror image of your old one.
- Pro Tip: Consider a Manual Transfer for Select Apps: If there are apps you no longer use, consider not transferring them to free up space on your new iPhone. You can always redownload them later if needed.
Erasing Your Old iPhone
Once you’ve confirmed that all your data has successfully transferred, you can erase your old iPhone.
- Go to Settings: On your old iPhone, navigate to Settings > General > Transfer or Reset iPhone > Erase All Content and Settings.
- Follow the Prompts: Confirm that you want to erase your device. This will remove all data, ensuring that your personal information remains secure when you sell or pass on your old iPhone.
- Final Tip: Backup Before Erasing: Even though you’ve transferred your data, it’s a good idea to back up your old iPhone one last time to iCloud or your computer, just in case you need to retrieve something later.
Conclusion
Transferring data from an old iPhone to a new one doesn’t have to be stressful. By following this guide, you can ensure that all your data, settings, and preferences are carried over smoothly. Remember to take your time with each step, and don’t hesitate to refer back to this guide if you encounter any issues. Enjoy your new iPhone!
How To Transfer Data From iPhone to iPhone
How To Transfer Data From iPhone to iPhone
How To Transfer Data From iPhone to iPhone
How To Transfer Data From iPhone to iPhone
How To Transfer Data From iPhone to iPhone
How To Transfer Data From iPhone to iPhone
How To Transfer Data From iPhone to iPhone
How To Transfer Data From iPhone to iPhone
How To Transfer Data From iPhone to iPhone